 ®
® 




Pwn2Own Ireland 2024: Dumping the Aeotec Smart Home Hub firmware
Pwn2Own Ireland in 2024 had a new entry in the Home Automation category: the AeoTec Smart Home Hub. We could not find any existing published research into the security of this hub, but based on the attack surface and the fact that this wasn't a well known vendor (at least to us), we assumed this would be an easy target. This turned out to be quite wrong. We did not succeed in finding any vulnerabilities usable for Pwn2Own, as we obtained the firmware of the device less than a week before the registration deadline. We think our journey of how we obtained it is quite interesting on its own, so we decided to publish that anyway.
Background
The Aeotec Smart Home Hub is based on the Samsung SmartThings Hub. Essentially, it's a home automation device that's meant to act as a "gateway" of sorts. It links devices across different protocols and allows users to automate and control multiple devices (e.g. up to 100 smart home devices over Zigbee).
It supports both Zigbee and Z-Wave, it has WiFi, Bluetooth, an Ethernet and a USB connector. It must be configured using the SmartThings app.
Hardware
We did not manage to find a download link for the Aeotec firmware, and we had no luck with the app either. So we quickly decided to investigate the hardware itself, in order to obtain the firmware and start our search for vulnerabilities.
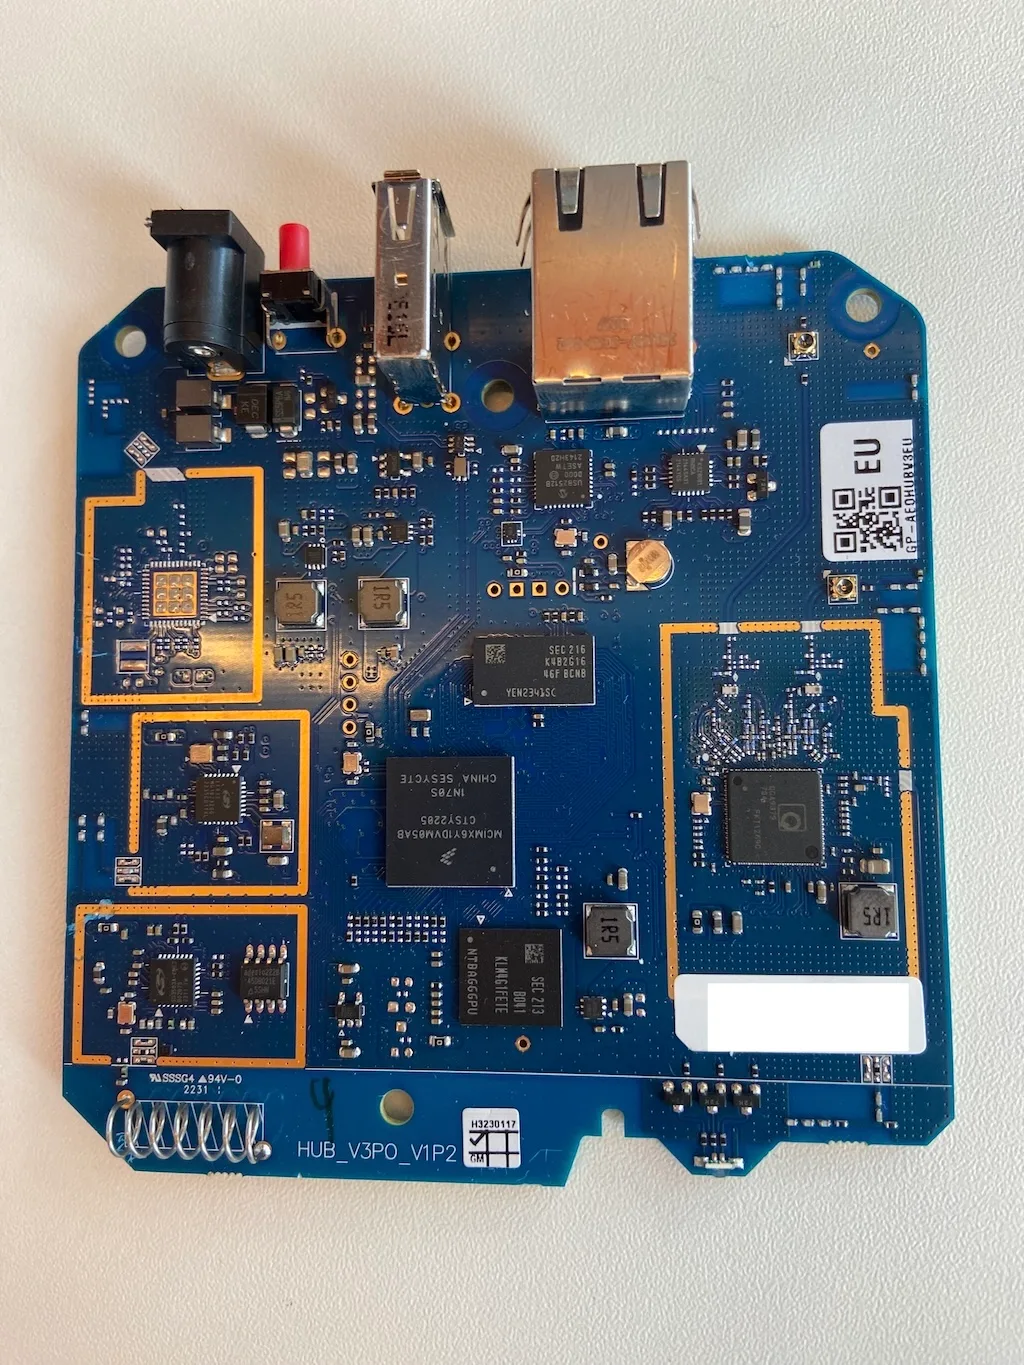
Looking at the main PCB, we identified the following main components:
- CPU: NXP MCIMX6Y1DVM05AB (Arm Cortex-A7)
- RAM: K482616
- eMMC: Samsung KLM4G1FETE-B041
- WiFi+Bluetooth: Qualcomm QCA9379
- USB controller: USB2512B
- Ethernet transceiver: KSZ8081
- Zigbee: Silabs EFR32MG1
- Z-Wave: Silabs SD3503A-CNE3
- Z-Wave flash: Renesas AT45DB021E-SSHN-T
We also spotted a UART connector on the PCB. Connecting to this gave us the boot log, but we could not interact with it at all (neither interrupting U-Boot or after boot). The logs did help us gain some more understanding of what the device was doing.
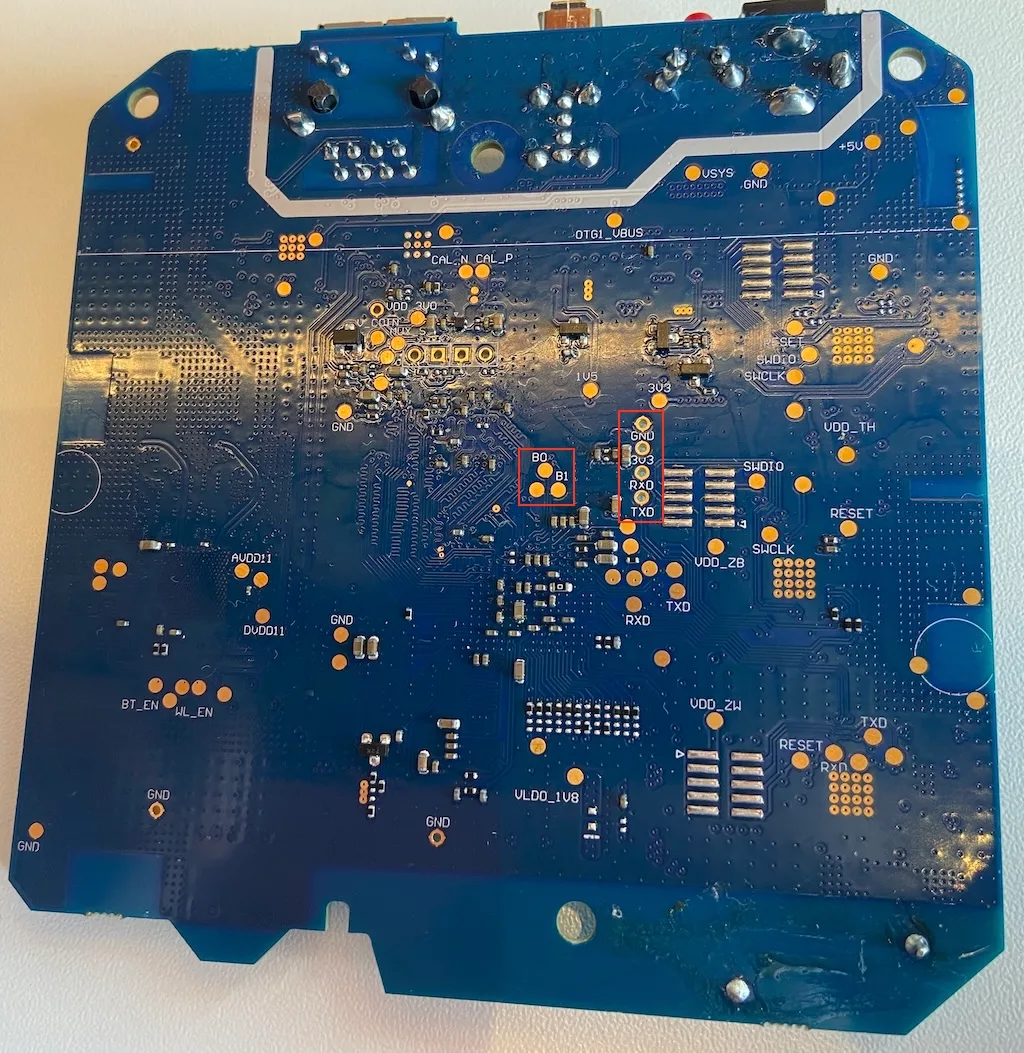
Next to the UART connector, we spotted test pads labelled B0 and B1. Based on the CPU's documentation we found out that these pads likely map to BOOT_MODE0 and BOOT_MODE1 pins which are used to determine the boot mode of the CPU. If we pulled B0 high, this would enable Serial/USB upload of firmware images. This mode is enabled even if secure boot is enabled and the boot mode is determined by e-fuses. We observed that the device would indeed boot differently (the status indication LED turned red, blinking green), but we could not interact with it using USB or serial. In addition, we did not have a valid and signed image to supply, so we gave up on this.
Dumping the eMMC
Unable to interact with the device or change the boot settings, we decided to try dumping the eMMC. This was a gamble, as the filesystems stored on the eMMC could be encrypted (and the boot log showed us at least some parts were encrypted with LUKS), but we hoped it would contain at least some unencrypted sections that we could use. While we could have desoldered it, we decided instead to read it in-circuit, as we didn't have a compatible BGA clamshell socket or eMMC reader on hand.
By staring at the board and the data sheets for the CPU and eMMC for a while, we eventually identified the traces relevant to the eMMC communication. We carefully scraped of some of the solder mask with a scalpel to access the vias and confirmed that it looked like eMMC communication. CMD, CLK, DATA0, DATA3 and DATA4 were easily reachable on the bottom, the other data lines are on the top and harder to reach. Therefore, we chose to use it in 1-bit mode by only interfacing with CMD, CLK and DATA0.
This eMMC does I/O signaling at 1.8V from the get go due to the power supply wiring (VCCQ is tied to a 1.8V rail). To read it, our first attempt was to place probes on the scraped off vias, connecting those through a level shifter to an ESP-32 board with an MMC peripheral. This setup was very unstable and we did not manage to get any correct communication with the eMMC going.
We improved its connection by very carefully soldering on some magnet wire to the exposed vias. This still did not manage to evoke any responses from the eMMC. We suspected that the level shifter was too slow for the clock speed required to interact with the eMMC (20+ MHz). We looked around for a different microcontroller we could use at 1.8V with an MMC peripheral, but we found nothing available.
Then we noticed that we had an STM32 Nucleo F756ZG board lying around. According to the STM32F756xx series datasheet, the MCU itself can run at 1.8V, but the rest of the board is designed to be powered at 3.3V or 5V (essentially 3.3V since 5V will be stepped down to 3.3V through an on-board voltage regulator). If we supply our power directly, could we maybe run it at 1.8V? Turns out that yes, it works. We just had to make a small modification to the board and underclock the CPU. After removing the zero Ohm resistor marked SB3 from the Nucleo board, we could attempt to power it directly with an external power supply at 1.8V.
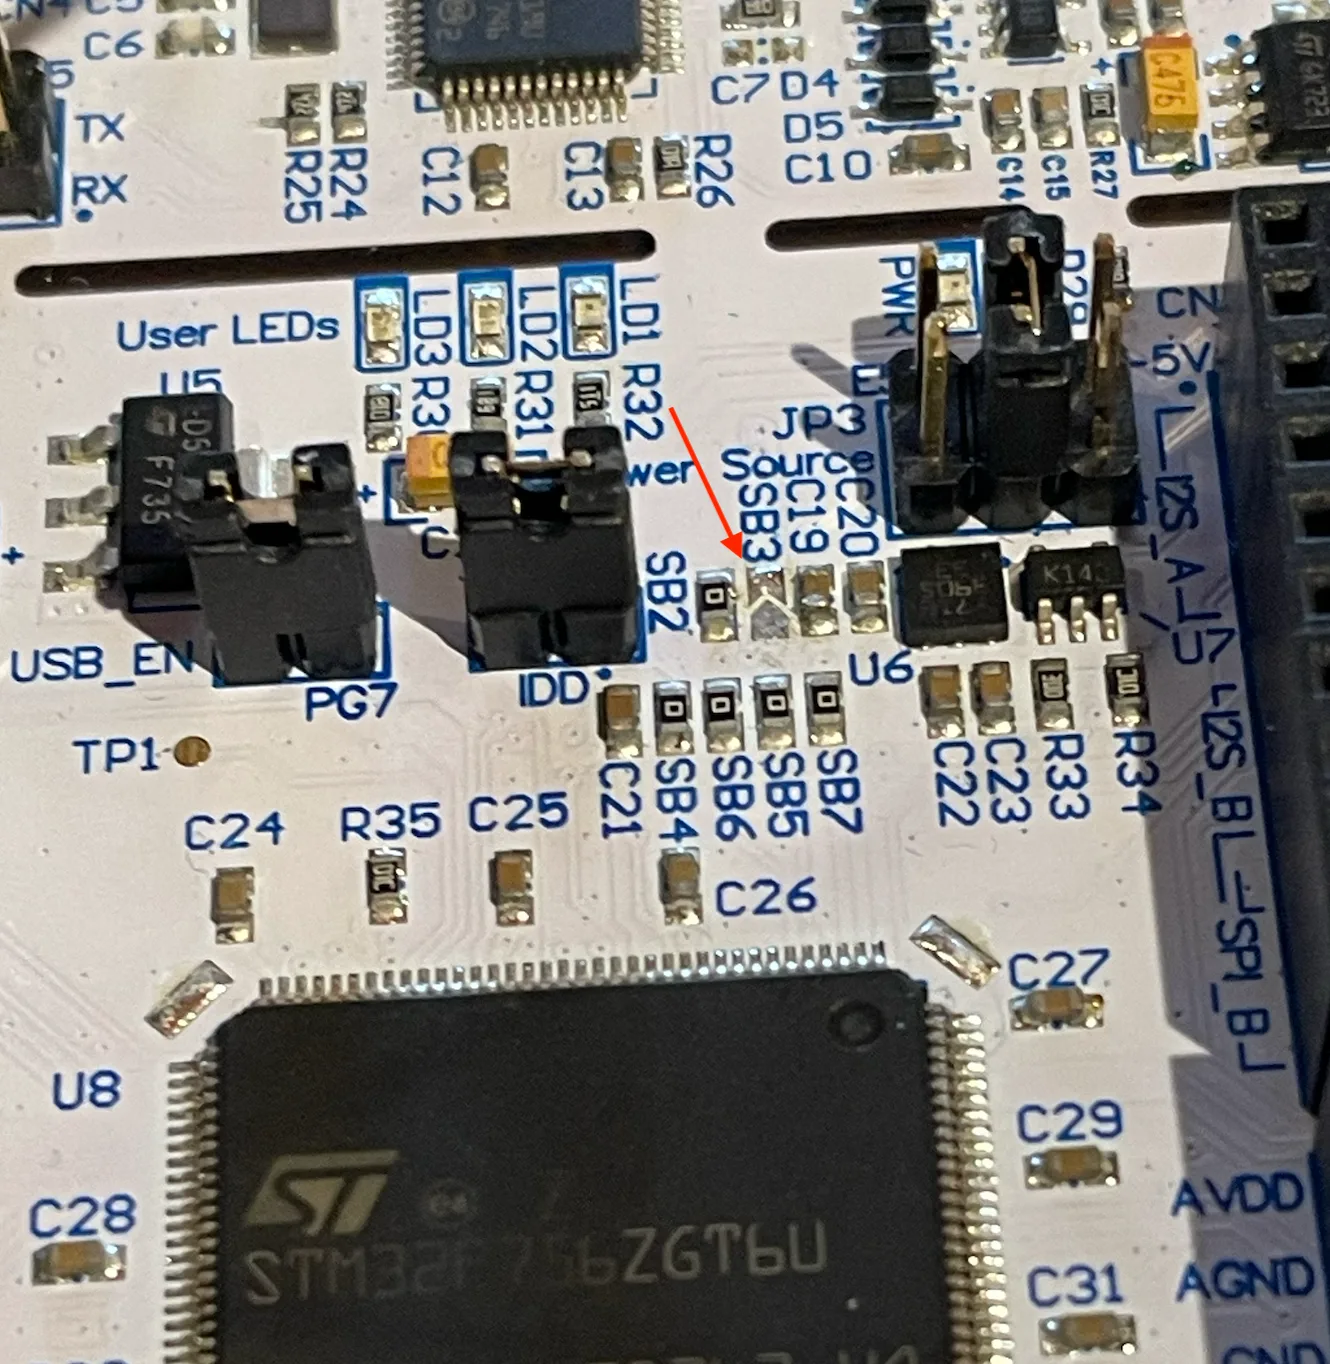
This was sufficient, along with the approrpiate clock configuration in the STM32CubeIDE configurator to get the board up and running at 1.8V.
We wrote some code using the vendor's IDE, but we kept running into issues with the ST HAL libraries when it came to SDMMC and UART I/O using the DMA engine. Regardless, after enough wrangling and defensive programming (read: retry, reset, then retry again loop), we were able to get the reading process going after weeks of trying different things.
But then we ran into one more issue. As we mentioned, we could pull B0 high to boot into "USB/Serial upload mode". This was nice for reading the eMMC, as it meant the CPU itself wouldn't try to communicate with the eMMC (we didn't manage to identify a RESET pin on the CPU we could use for that). But some watchdog or a timeout would eventually kick in, after which the CPU would start trying to read the eMMC again. Instead of working around that, we went for the rigorous solution: we made tiny cuts in the CMD and CLK lines between the CPU and eMMC.
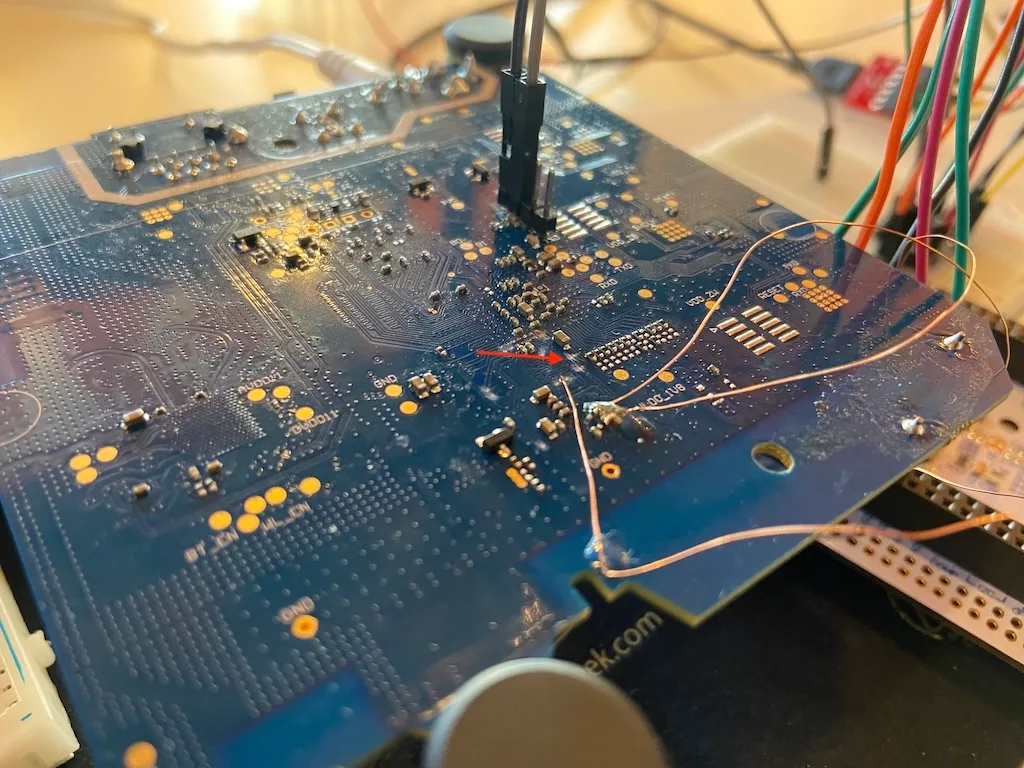
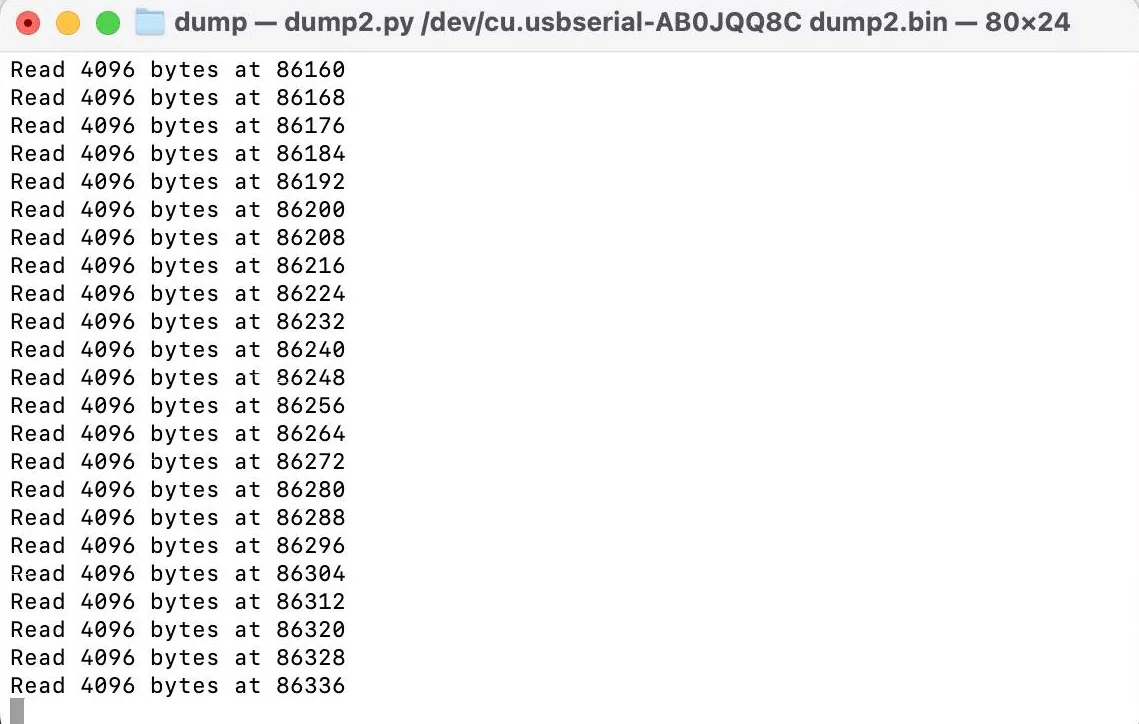
Now we could make a full dump of the entire eMMC user area as well as the 2 boot partitions. The process took a few hours due to the 1-bit data line and the slow-ish serial connection to our machine.
Analysing the firmware
The eMMC user area contained two different partitions:
- A FAT partition, containing 4 FIT image files:
standard.fitstandard.fit.oldrecovery.fitrecovery.fit.old
- An LVM container containing LUKS encrypted volumes, including:
hub_datahub_factoryhub_roothub_golden
The FIT images also appeared to have a signature, so we would not be able to modify them. They are thankfully not encrypted, so we could analyse them.
There were additionally 2 U-Boot images flashed to the eMMC boot partitions.
Secure boot using LUKS
By analysing the dump, we figured that the boot process is supposed to work somewhat like this:
- The ROM loads U-Boot from one of the two eMMC boot partitions. U-Boot is signed, the public key hash has to match the SRK stored in the e-fuses during the HABv4 authentication step.
- U-Boot mounts the FAT partition and loads
standard.fit, verifying its signature. - U-Boot unpacks OP-TEE, the kernel, device tree and initial RAM disk.
- OP-TEE is started (in the secure world), which launches the Linux kernel in the normal world.
- One of the init scripts from the RAM disk obtains a key from the TEE and uses it to open the LUKS images from the LVM container using
cryptsetup. - The last init script switches the root volume to the mounted
lv_rootLUKS volume usingswitch_root.
The opening of the LUKS volumes happens as follows:
/init.d/11-mountcrypto:
CRYPTTAB="\
  /dev/vg_emmc/lv_data:hub_data
  /dev/vg_emmc/lv_factory:hub_factory
  /dev/vg_emmc/lv_root:hub_root
  /dev/vg_emmc/lv_golden:hub_golden
"

mountcrypto_run() {

    [...]

    # tee-supplicant is expected to have been started already
    local key="$(get_key)"

    [...]

    for entry in ${CRYPTTAB}; do
        volume=$(echo $entry | cut -d ':' -f 1)
        name=$(echo $entry | cut -d ':' -f 2)
        device=/dev/mapper/${name}

        msg "Opening LUKS '$name' from device '$volume'"
        echo -n "${key}" | cryptsetup -q luksOpen --allow-discards -d - ${volume} ${name}
        [ $? -ne 0 ] && fatal "Unable to open LUKS volume ${volume}"
    done

    [...]
Here get_key is a simple wrapper script for a binary that communicates with an application running on the TEE to obtain a key.
All of this matches with the boot log we saw on UART:
...
Starting tee-supplicant
random: lvm: uninitialized urandom read (4 bytes read)
  Found volume group "vg_emmc" using metadata type lvm2
Activating volumes on ...
random: lvm: uninitialized urandom read (4 bytes read)
  6 logical volume(s) in volume group "vg_emmc" now active
Opening LUKS 'hub_data' from device '/dev/vg_emmc/lv_data'
random: cryptsetup: uninitialized urandom read (2 bytes read)
Opening LUKS 'hub_factory' from device '/dev/vg_emmc/lv_factory'
random: cryptsetup: uninitialized urandom read (2 bytes read)
Opening LUKS 'hub_root' from device '/dev/vg_emmc/lv_root'
random: cryptsetup: uninitialized urandom read (2 bytes read)
Opening LUKS 'hub_golden' from device '/dev/vg_emmc/lv_golden'
random: cryptsetup: uninitialized urandom read (2 bytes read)
Checking read/write file systems
fsck from util-linux 2.37.4
fsck.fat 4.2 (2021-01-31)
Checking we can access the last sector of the filesystem
Boot sector contents:
System ID "mkfs.fat"
Media byte 0xf8 (hard disk)
       512 bytes per logical sector
      8192 bytes per cluster
        16 reserved sectors
First FAT starts at byte 8192 (sector 16)
         2 FATs, 16 bit entries
    131072 bytes per FAT (= 256 sectors)
Root directory starts at byte 270336 (sector 528)
       512 root directory entries
Data area starts at byte 286720 (sector 560)
     65500 data clusters (536576000 bytes)
16 sectors/track, 4 heads
         3 hidden sectors
   1048573 sectors total
Checking for unused clusters.
/dev/mmcblk1p1: 5 files, 10677/65500 clusters
e2fsck 1.46.5 (30-Dec-2021)
/dev/mapper/hub_data: recovering journal
Setting free inodes count to 64259 (was 64260)
Setting free blocks count to 241994 (was 241995)
/dev/mapper/hub_data: clean, 253/64512 files, 16054/258048 blocks
Mounting filesystem /dev/mapper/hub_data using fstab options
EXT4-fs (dm-6): mounted filesystem with ordered data mode. Opts: (null). Quota mode: disabled.
Mounting filesystem /dev/mapper/hub_factory using fstab options
EXT4-fs (dm-7): mounted filesystem with ordered data mode. Opts: (null). Quota mode: disabled.
Mounting filesystem /dev/mapper/hub_root using fstab options
Mounting filesystem /dev/mapper/hub_golden using fstab options
Moving mount /hub/factory
Moving mount /hub/data
Moving mount /hub/golden
Stopping tee-supplicant (pid: 228)
...
LUKS ≠ secure boot
As we did not have access to the key and it was using secure boot, it was looking quite hopeless for us obtaining the firmware this way. But then we realised: this code means the LUKS volumes are not authenticated, only encrypted. LUKS is designed to guarantee confidentiality, not integrity, and while it does have support for some authenticated ciphers (AES-GCM), this still does not prove the authenticity of the entire image.
This means that we can defeat the secure boot of this device by finding a LUKS image such that, when luksOpen is called with a password we don't know, decrypts into data we control. This depends primarily on the implementation details of the LUKS file format, which is a very different challenge from generating a cryptographic signature without the private key!
When mounting a LUKS volume using cryptsetup luksOpen on Linux, the encryption key is derived from the passphrase by cryptsetup, but the actual symmetric decryption happens in the kernel. Therefore, the list of supported cryptographic algorithms is also determined by what the kernel supports. Interestingly for us, the Linux kernel by default supports "cipher_null", which means the data is not encrypted at all and the key is ignored.
Sadly, when we tried it, it didn't work: while we can create a cipher_null LUKS image, cryptsetup has a check that if a null cipher is used, but a (non-empty) passphrase was entered, it refuses to open the image:
    /* Allow only empty passphrase with null cipher */
    if (!r && crypt_is_cipher_null(hdr->cipherName) && passwordLen)
        r = -EPERM;
Where crypt_is_cipher_null is defined as:
bool crypt_is_cipher_null(const char *cipher_spec)
{
    if (!cipher_spec)
        return false;
    return (strstr(cipher_spec, "cipher_null") || !strcmp(cipher_spec, "null"));
}
It didn't work, but that check was looking quite odd. Searching for a substring in the cipher name is weird. We presume the the reason for this check is because cryptsetup normally doesn't care about the different algorithms, it just passes the cipher name from the image to the kernel. So this function was meant to catch any name that the kernel would interpret as the cipher_null algorithm. A parser differential between what cryptsetup checks and the kernel interprets might allow us to bypass this check and get a cipher_null image accepted even with a password.
We looked at the commit history for this function and we noticed it had been modified in 2021: earlier, it only did a strcmp for "cipher_null", instead of a strstr.
    /* Allow only empty passphrase with null cipher */
    if (!r && !strcmp(hdr->cipherName, "cipher_null") && passwordLen)
        r = -EPERM;
That was very interesting, as the check became more strict. While the standard.fit image from our hub used a cryptsetup that had the newer, strict check, the standard.fit.old image had a build date of "Tue Aug 18 16:53:49 UTC 2020" and so this change was not yet included! This older image was still properly signed, so we could boot it fine.
Now we just had to figure out how to bypass the old check. We found that cryptsetup normally combines the cipher name with a block chaining mode. For our cipher_null image, this mode was ecb, resulting in cipher_null-ecb. If we created a LUKS image with cipher_null, but manually changed the algorithm to cipher_null-ecb and removed the chaining mode, it would pass the check in the old version of cryptsetup, but the kernel would still correctly mount it as a cipher_null-encrypted volume, thus ignoring the key!
Modifying the eMMC
To perform this attack, we modified the eMMC as follows:
- First, we crafted a squashfs image to act as the new rootfs. We duplicated the rootfs from the FIT image and added
/sbin/initcontainigexec /bin/sh. - We copied the squashfs image to a
cipher_nullLUKS volume. - Then we hex-edited the cipher algorithm of the volume to
cipher_null-ecband no chaining mode. - We renamed
standard.fittostandard.fit.newand thenstandard.fit.oldtostandard.fit. - We renamed the
lv_rootLVM volume tolv_root_original. - We added a new LVM volume named
lv_rootand copied our LUKS image to it.
Another wrench in the gears
To make the desired modifications, we updated our code to add writing capabilities as well. However, more issues with the ST HAL creeped up. This time, we were unable to get it to write properly at all regardless of what we tried. Every time we issued a write command for a given block, the end result is that the block was erased but the data we provided was not written. We spent a little time on it but ultimately we were fed up with the ST HAL so we gave up on that route entirely and decided to look at other options.
Shortly afterwards, we noticed that the MicroPython SDMMC driver for the STM32 ports looked rather well-built. We cloned the repository and made a few patches to enable SDMMC, set up the right pin mappings, modify the clock setup for low power operation and gave that build a try. To our surprise, this worked immediately. Here are the patches we made, based off commit 17d823:
diff --git a/ports/stm32/boards/NUCLEO_F756ZG/mpconfigboard.h b/ports/stm32/boards/NUCLEO_F756ZG/mpconfigboard.h
index fd0d32803..eaceb1773 100644
--- a/ports/stm32/boards/NUCLEO_F756ZG/mpconfigboard.h
+++ b/ports/stm32/boards/NUCLEO_F756ZG/mpconfigboard.h
@@ -6,27 +6,37 @@
 #define MICROPY_HW_BOARD_NAME       "NUCLEO-F756ZG"
 #define MICROPY_HW_MCU_NAME         "STM32F756"
 `
-#define MICROPY_HW_HAS_SWITCH       (1)
-#define MICROPY_HW_HAS_FLASH        (1)
-#define MICROPY_HW_ENABLE_RNG       (1)
-#define MICROPY_HW_ENABLE_RTC       (1)
-#define MICROPY_HW_ENABLE_DAC       (1)
-#define MICROPY_HW_ENABLE_USB       (1)
+#define MICROPY_HW_HAS_SWITCH                    (1)
+#define MICROPY_HW_HAS_FLASH                     (1)
+#define MICROPY_HW_ENABLE_RNG                    (1)
+#define MICROPY_HW_ENABLE_RTC                    (0)
+#define MICROPY_HW_ENABLE_DAC                    (0)
+#define MICROPY_HW_ENABLE_USB                    (0)
+#define MICROPY_HW_ENABLE_MMCARD                 (1)
+#define MICROPY_HW_ENABLE_MMCARD                 (1)
+#define MICROPY_HW_SDCARD_BUS_WIDTH              (1)
+#define MICROPY_HW_SDCARD_MOUNT_AT_BOOT          (0)
+#define MICROPY_HW_ENABLE_INTERNAL_FLASH_STORAGE (1)
+#define MICROPY_HW_SDCARD_CK			 (pin_C12)
+#define MICROPY_HW_SDCARD_CMD			 (pin_D2)
+#define MICROPY_HW_SDCARD_D0			 (pin_C8)
+
+#define MICROPY_HW_MMCARD_LOG_BLOCK_NBR		 (7634944)

 // HSE is 8MHz
 // VCOClock = HSE * PLLN / PLLM = 8 MHz * 216 / 4 = 432 MHz
 // SYSCLK = VCOClock / PLLP = 432 MHz / 2 = 216 MHz
 // USB/SDMMC/RNG Clock = VCOClock / PLLQ = 432 MHz / 9 = 48 MHz
 #define MICROPY_HW_CLK_PLLM (4)
-#define MICROPY_HW_CLK_PLLN (216)
+#define MICROPY_HW_CLK_PLLN (52)
 #define MICROPY_HW_CLK_PLLP (RCC_PLLP_DIV2)
-#define MICROPY_HW_CLK_PLLQ (9)
+#define MICROPY_HW_CLK_PLLQ (4)

 // From the reference manual, for 2.7V to 3.6V
 // 151-180 MHz => 5 wait states
 // 181-210 MHz => 6 wait states
 // 211-216 MHz => 7 wait states
-#define MICROPY_HW_FLASH_LATENCY    FLASH_LATENCY_7 // 210-216 MHz needs 7 wait states
+#define MICROPY_HW_FLASH_LATENCY    FLASH_LATENCY_8 // 210-216 MHz needs 7 wait states

 // UART config
 #define MICROPY_HW_UART2_TX         (pin_D5)
@@ -37,7 +47,7 @@
 #define MICROPY_HW_UART3_RX         (pin_D9)
 #define MICROPY_HW_UART6_TX         (pin_G14)
 #define MICROPY_HW_UART6_RX         (pin_G9)
-#define MICROPY_HW_UART_REPL        PYB_UART_3
+#define MICROPY_HW_UART_REPL        PYB_UART_2
 #define MICROPY_HW_UART_REPL_BAUD   115200

 // I2C buses
diff --git a/ports/stm32/boards/NUCLEO_F756ZG/pins.csv b/ports/stm32/boards/NUCLEO_F756ZG/pins.csv
index c129f7417..455dccdbe 100644
--- a/ports/stm32/boards/NUCLEO_F756ZG/pins.csv
+++ b/ports/stm32/boards/NUCLEO_F756ZG/pins.csv
@@ -75,3 +75,6 @@ ETH_RMII_RXD1,PC5
 ETH_RMII_TX_EN,PG11
 ETH_RMII_TXD0,PG13
 ETH_RMII_TXD1,PB13
+D43,PC8
+D48,PD2
+D47,PC12
diff --git a/ports/stm32/system_stm32.c b/ports/stm32/system_stm32.c
index b76a41e97..8fe43aa89 100644
--- a/ports/stm32/system_stm32.c
+++ b/ports/stm32/system_stm32.c
@@ -488,9 +488,12 @@ MP_WEAK void SystemClock_Config(void) {

     #if defined(STM32F7)
     /* Activate the OverDrive to reach the 200 MHz Frequency */
+    // KMHN EDIT: Disable overdrive for low power build
+    /*
     if (HAL_PWREx_EnableOverDrive() != HAL_OK) {
         MICROPY_BOARD_FATAL_ERROR("HAL_PWREx_EnableOverDrive");
     }
+    */
     #endif

     #if defined(STM32G4)
Note that the configuration parameter MICROPY_HW_MMCARD_LOG_BLOCK_NBR is specific to the eMMC at hand. It mainly exists as capacity forcing workaround because the MicroPython STM32 port uses an older version of the ST HAL that does not implement reading the extended CSD.
And finally, we were able to write the desired modifications to the eMMC and verify the expected state using a couple of Python scripts.
And the moment of truth
We then reconnected the traces we cut between the CPU and the eMMC (we tried a few different things, but in the end a drop of solder on the cut worked the best) and powered the device back on.
The hub booted and our strategy worked! We got a shell over UART!
urandom_read: 2 callbacks suppressed
random: lvm: uninitialized urandom read (2 bytes read)
random: lvm: uninitialized urandom read (4 bytes read)
  Reading all physical volumes.  This may take a while...
  Found volume group "vg_emmc" using metadata type lvm2
random: lvm: uninitialized urandom read (4 bytes read)
  7 logical volume(s) in volume group "vg_emmc" now active
random: cryptsetup: uninitialized urandom read (2 bytes read)
EXT4-fs (dm-7): recovery complete
EXT4-fs (dm-7): mounted filesystem with ordered data mode. Opts: (null)
random: cryptsetup: uninitialized urandom read (2 bytes read)
EXT4-fs (dm-8): mounted filesystem with ordered data mode. Opts: (null)
random: crng init done
device-mapper: crypt: Selected cipher does not support IVs
device-mapper: crypt: Selected cipher does not support IVs
/init: line 144:   256 Terminated              tee-supplicant 2>&1 > /dev/null
udevd: 2 output lines suppressed due to ratelimiting
/bin/sh: can't access tty; job control turned off
/ # busybox id
uid=0 gid=0
/ # uname -a
Linux SmartThings 4.9.229-smartthings #1 Tue Aug 18 16:53:49 UTC 2020 armv7l armv7l armv7l GNU/Linux
We could now request the encryption key from the TEE, so we could decrypt all LUKS images and start analysing them:
## ./usr/bin/luks_pass get
47E0[...]B0B5
By uploading the normal root filesystem and applying a few patches, we could even start the normal userland, while maintaining our shell access.
Looking for vulnerabilities
We could now finally start looking at the firmware and debug on the target. We had less than a week until the registration of Pwn2Own, so we hoped for something simple and easy to exploit. That did not work out: a large amount of the hub's functionality is implemented in a couple of large binaries written (partly) in Rust. So after a short time, we decided to give up on this target and switched to improving our SOHO Smash-up exploit chain instead. As those bugs are still awaiting patches, you'll have to check back later to see those write-ups!
The fix
While our method no longer works with the latest cryptsetup, it is not a very good fix. In the commit that added the check originally, the LUKS developers make it clear that LUKS provides only confidentiality:
If the null cipher is used, allow only empty password for LUKS.
The cipher_null is no-encryption, it can be used for testing or temporarily when encrypting device (cryptsetup-reencrypt).
Accepting only empty password prevents situation when you replace a LUKS header on an unlocking device with the faked header using null cipher (and the same UUID). Here a system could think that the device was properly unlocked (with any entered password) and will try to use this unencrypted partition instead. (IOW it prevents situation when attacker intentionaly forces an user to boot into dirrerent system just by LUKS header manipulation.)
Properly configured systems should have an additional integrity protection in place here (LUKS here provides only confidentiality) but it is better to not not allow this situation in the first place. (Despite the fact that once you allow physical tampering of your system it cannot be properly secured anymore.)
Other methods may still work to perform the same attack, like finding a different cipher name or a particular way of setting up the LUKS key derivation. Because it's not considered important in LUKS threat model, these issues may never get found and fixed, and they are not treated as vulnerabilities (the change that made the check more strict was not reported as a vulnerability and did not get a CVE).
A more proper fix would be to verify a signature over a hash of the root filesystem. This could be done by hashing it before switching to it, or using dm-verity. dm-verity is a feature in the Linux kernel that allows verifying the integrity of a filesystem using a Merkle hash tree, which means every block can be cryptographically verified to be not be tampered with at the moment it's read. The advantage of this method is that it can even detect changes to the filesystem after boot and it doesn't require reading the entire filesystem before booting it.
In case you want to do research on the Aeotec hub, this should be reproducible by anyone with the ability to read/write the eMMC, as long as you have an old enough standard.fit image available (SHA1 hash of our image: 0a7db0699db4571d9d653cc128abb998057efe84).